

First of all, you need to measure your window so you make sure you get enough fabric. That may seem obvious to most of you, but sometimes I forget details. This detail is very important. And it's quite frustrating to pick out a cute fabric, take it up to the counter, only to have the nice lady ask you, "So how much do you need?" And you have no idea. Oh, by the way, when you pick a fabric, if this is your first attempt at making curtains, I would stick with a pretty forgiving pattern, maybe even a solid color. If you pick a chevron pattern or one with stripes, for example, you have to work extra hard to keep it straight. Just a little advice, but if you have you heart set on one, just go with it and keep checking it as you go. Also, if your fabric is really thin, you'll probably want to glue some sort of backing to the curtain so it won't be a sheer when it's not supposed to be. :) Just buy a cheapo fabric, white or whatever solid color that works with your curtain.
While you're at the fabric store, make sure to pick up a tape measure if you don't already have one and some fabric glue. The glue I used was called "Fabric Fusion." You will also need your iron and ironing board. If you're like me, you'll need to find it in the closet.

Since you've already measured your window, you should know about how big your curtains need to be. Remember, if you want you curtains to be a straight panel, you'll need the curtain to be the same size as the window. But if you want it to bunch up and like kind of ruffly like mean, you'll need to add about another foot to the length of your window. So, since my window was 36 inches across, the panel I made was actually about 50 inches across.
Start with what will be the top of your fabric. Use the straightest edge for your top. Make sure as you go, to keep looking to make sure when your curtains hang, they look level and the pattern stays straight across, unless the pattern on the fabric doesn't matter or if you chose a solid color. Because the curtain rods I use go inside the curtain (is that a pocket rod? did I make that up?), I measure about 3 inches at the top. So I measure three inches of fabric, then fold it over, then iron the fold so that it stays. Keep doing that all along the edge until you come to the end, measuring and ironing all the way down. I went ahead and measured and ironed all four sides, then I went back and glued last.
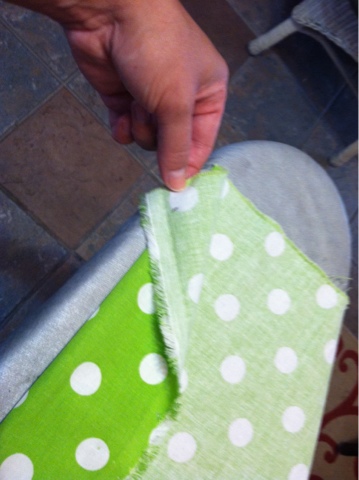

On the sides, all you have to do is fold it over and measure about an inch. Same thing, measure and fold.

When you measure the bottom, you need to measure from what will be the top of your curtain so that the length will be the same all the way across.

Finally, it's time to glue! At the top, remember to not glue the whole cuff because you need room the stick the rod in. I put the glue on the bottom edge of the cuff. Just press with your fingers as you glue. You might want a rag to keep the glue off of your fingers.


Then, just glue the whole cuff on the sides and the bottom. And you're done! You need to let the glue dry for at least 2-4 hours. If you need to add another layer to make your curtain not see through, just measure the cheapo fabric to hang from the bottom of your cuff at the top of the curtain, down to about a half inch of the bottom. Then, just glue it to the back of your curtain.
Whew! I hope I made sense. If you plan on using these directions, please let me know! And let me know how it goes! If anything is not clear, please let me know that, too! I know what I mean in my own head, anyway! Thanks for visiting!


